Monday, September 4, 2017

Garage face-lift

Happy Labor Day everyone! How did you spend your weekend? Was it shopping, watching the Huskers win...barely, relaxing, or enjoying the last warm days of summer by going to the lake?  Well my family and I took the term Labor and ran with it.

This project was a long time coming.  Remember my awesome Dad, the carpenter who helped me with my beautiful buffet and helped me recover my basement stairs?  He came Friday with my mom and my sister and future brother-in-law joined Saturday to give my little one stall garage some much needed TLC.

Starting with some before pictures you can sure see how sad it really was before.

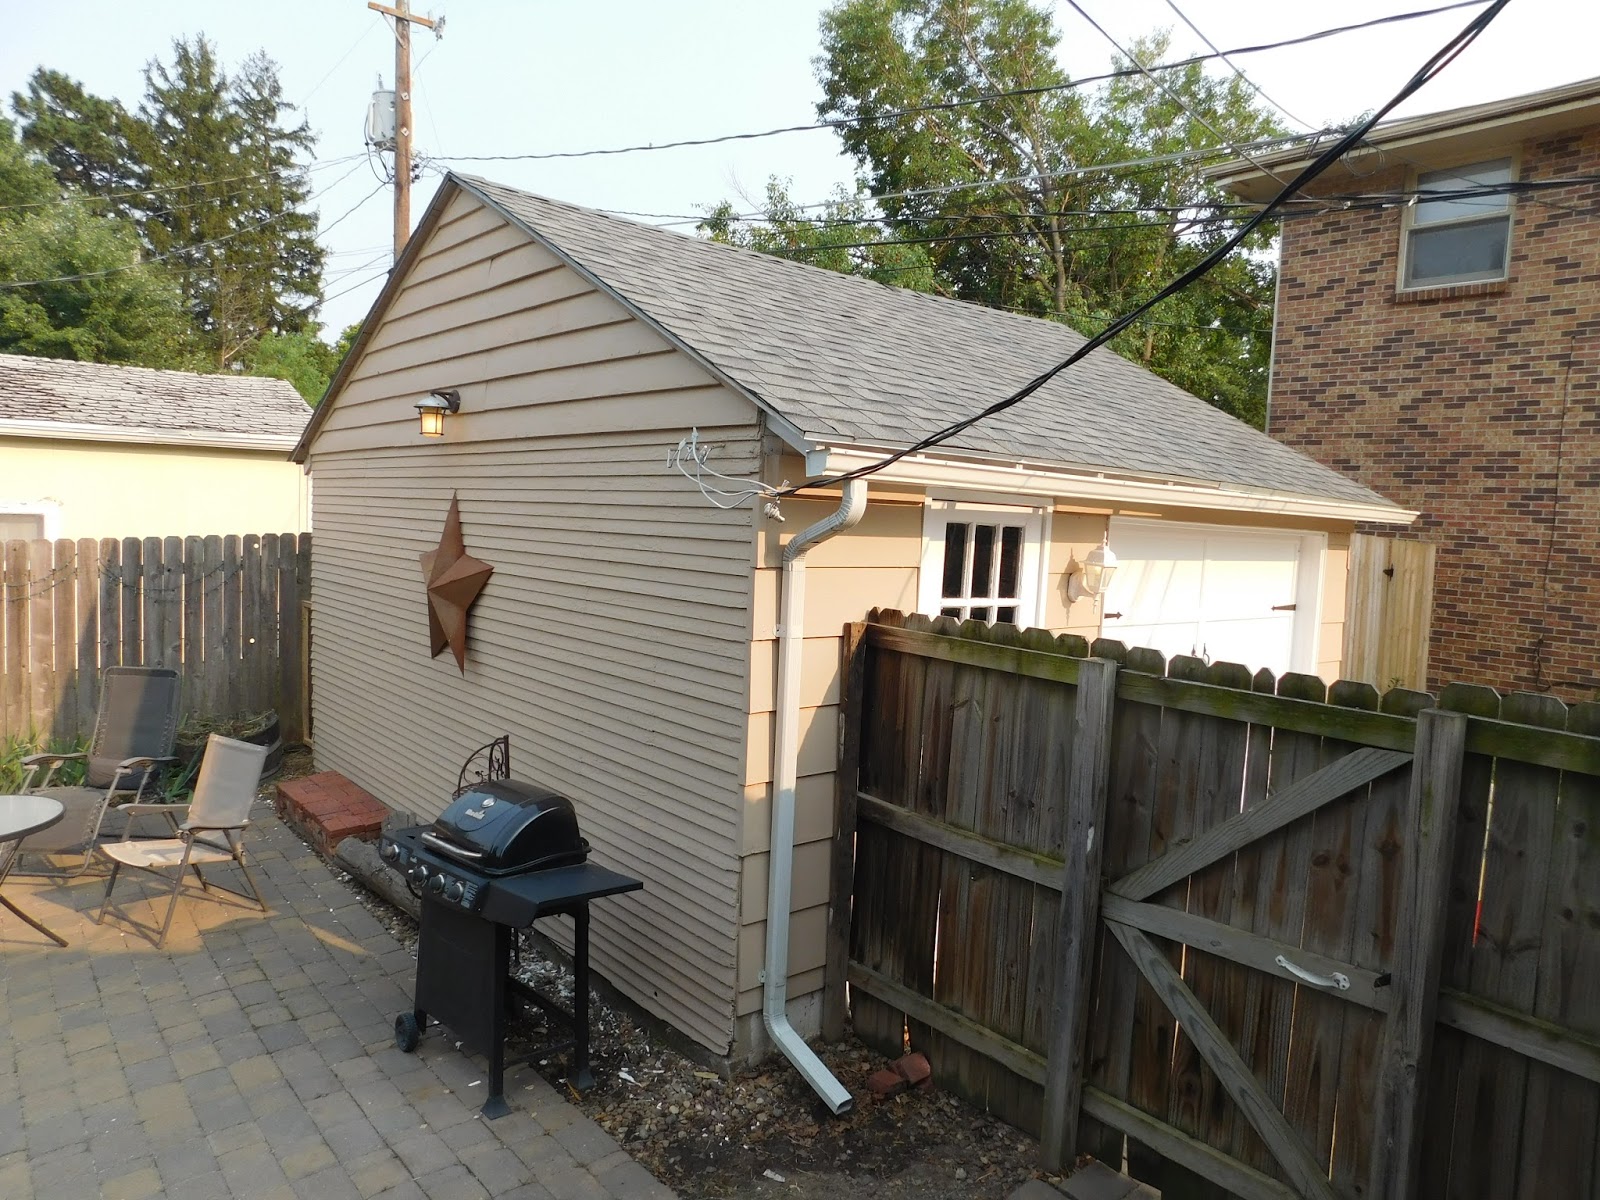
Nothing too spectacular, but it gets the job done. It has really old siding that probably needs to be re-done and had an old rusty gutter on the front.  The walk in door has seen better days with no only chipped paint but two missing glass panels in the window portion of the door.  The bones and the roof are in good shape though so I knew it had potential.


Here shows one of the problems I had with the garage was the fact that my nice siding on the house is tan, but the garage is just this little white building that adds nothing to curb appeal.

From the back yard it looked ok, but again there was chipping on the paint, some of the siding was a bit rotted and the weather had taken some of the color from my star decoration from the star down onto the white paint.

Not to mention the weeds that you can see there if you look closely that my awesome Mother pulled for me :).

So we went to work scraping, and scraping, and scraping.  We had to tame some wild brush that had grown pretty tall on the back and my neighbor's side of the garage and Dad tore down the old gutters and ripped out old rotten siding and replaced it with some new boards.  The great thing is, he used scrap boards that either he or I already had. That helped cut down on the cost of materials so much! That combined with the fact that I had the paint already from a sale like a year ago that was buy one get one free :).

Then like all good Husker fans, we took a break, went to my aunt and uncle's house for their traditional "Redneck football party" and cheered the team on to a very close (too close) win but hey I'll take it.

Regrouped and with reinforcements from my sister and bro-in-law to be, we started painting. Which, if you ask me, is the most exciting part. :)

Before I get to the after pictures, what is this post missing?  Oh that's right, some inspiration pins!
Probably the biggest one is the pretty carriage hardware you see all over Pinterest and that I've pinned to my Outdoors board:

You would not believe how much of a difference this makes it's ridiculous.  So when I first ordered these I got them from Walmart.com.  I chose the cheapest shipping and was expecting them to arrive tomorrow.  Yes, tomorrow the day AFTER labor day. Surprise though! They came like 5 days ago! I was super excited, that almost never happens that things arrive a week before they're estimated.

Ok now I'm ready to show you the after pictures :)

Here's the new and vastly improved little garage.
It's so much less boring!  Plus now it really matches the house much better.  It's not exact but I don't care.  It needs to be completely resided someday but the budget doesn't have room for it yet, plus it still does the job of keeping my car/extra furniture/tools/garage fridge safe and sound :)

We replaced the missing glass panels too so now when I lock my garage door it actually keeps people out, and also keeps birds and wasps out.  My dad had some gutter pieces already and it matches what's on the house much better than the old blue stuff.


How about that carriage hardware huh? It's my favorite part ever! So cheap and easy to give the garage a completely different look!  And now from the back yard!


Doesn't it look so nice? I didn't even notice but the paint color even matches my patio furniture better.
A few other little projects from the weekend:


This little gate was made from some 2X4's that were cut down and some fencing stapled to it.  This is much needed to keep my little furry friend out from behind the garage.  Buster tries to get back there and bark at all the neighbor dogs.  One of them lives just on the other side of that chain link fence behind the garage there.  That particular fence is in really bad shape but it's not mine, so I always worried Buster would get back there and one or the other of the dogs would get to the other so I had a pallet propped there for years and it did the trick.  However after nicely painting the garage, I didn't want to keep the same thing going.  Enter super Dad :) He whipped this up for me like it was nothing :).

Speaking of pallet projects.  Since I had one to spare, and there was a flimsy one that I had laying around Dad and I created another backyard solution.  Buster started this habit of relieving himself on my air conditioner unit which of course is no bueno.

To stop this from getting any worse, we screwed both those pallets together and got them just in front of the AC unit close enough to not be in the way and protect the unit but also far enough away to still allow the proper air flow needed.

I was going for something like this pin:

We didn't have time to do that this weekend.  Maybe next time but for now this works:


So that was our Labor day weekend. Complete with breaking in a new fire pit :)

So one last look at the cub appeal improvement :)


What did you guys do this weekend?  I got lots of blisters from so much painting!

Sunday, August 13, 2017

Miracle weight loss tips!!


Ok I know this post isn't about home decor, but that's not the only topic Pinterest has out there and this blog is all about taking Pinterest Pins and making them a reality so let's step into my latest project.....ME!!!

I can't tell you how many pins/web sites/products/diets I've looked at over the years.  I was kind of stuck in this world of saving pins with work outs and diet plans and products but never tried any of them.  

true

There are so many pins or links that promise to let you in on their secret to success but you have to read a huge long story to get to the stuff you wanted in the first place and sometimes they don't even show the secret unless you buy something first! Frustrating!

So as promised here's my tips for everyone to help lose weight.................................................................................................................................................................................................drum roll .......................................................................................................................................................................................................................................................................................are you ready? ..............................................................................................................................................................................................you won't like it, but .................................................................................................................................................................................................................................................... (cymbal crash!)

1. Get up off your ass and start moving.  Go to the gym, go for a walk, hit 10000 steps every day, get up and clean something, stand at your desk instead of sitting.

2. Put that freaking fast food down and make yourself a damn sandwich. I had to tell myself that all the time! I was a freak for fast food because it was "easier" but I finally called bullshit on myself.  Honestly the thing that helped with the fast food was doing a budget.  When I saw the number that I spent on fast food I had to have an intervention with myself haha.  So now I pack my lunch and if I forget, I pick something from the break room that's a better option than shooting over to McDonald's quick.  Let me admit this, I love fast food guys! It's so tastey and I wish someone could come up with a way to make healthy foods taste as good as the junk we love.  But since that won't happen, I limit myself to 1 or 2 times a week eating out instead of every day or even every meal like I had for a while (yikes). But don't cut it out completely, you'll just be sad and when you're sad, you mope around and when you mope, you're being lazy.  Don't be lazy :).

3. Find a buddy to do this with to keep each other accountable.  I have started the process of eating better and working out so many times since I got out of high school, I can't even count them all.  And each time I failed because I didn't ever stick with it. The difference this time is that I have a couple different work out buddies and a friend from work who's eating healthier with me. (although she's doing way better than I am on that front lol) If I don't have someone meeting me at the gym, I'm probably going to skip.  But knowing that the other person is there saving me a spot in the class helps me drag my ass down there and put in some work.  

If you don't have anyone who wants to work out with you, do classes at your gym.  In the past I've tried online videos or work out dvd's and while it's convenient to do at home, there's no one there to see how hard you're actually working.  It's really easy to stop and rest, or just quit all together and you only have the dog or cat silently judging you.  This is all different in a classroom environment. You see everyone there working and the instructor looking at you and every time you want to stop, you remember that people can see you and you push a little harder.  It's amazing how much competitive nature we all have in us that gives us the desire to not look weak.  

Last but not least:
4. Channel your inner motivator. Want to impress people you haven't seen in years? Want to get all those compliments from friends and family because you might be an inner narcissist like me? Haha.  Want to get that revenge body?  Had a stressful day at work? Want to be able to sleep better at night?  Whatever your motivator is for that day or time in your life, or simply whatever works best, keep that at the front of your mind and use it to push yourself harder, to distract yourself while you're working out from the muscle fatigue, and to get through the workout or even get yourself to the gym or going on that walk.

There you have it folks.  The secrets to success that everyone actually knows already.  It's just not easy to hear or to make the moves toward putting them into action.  But it's how I lost 30 pounds in 7 months, and I'm no where near done yet. :)

Here's the proof, same outfit but progress before and during:

That's how it's done everyone! I'm still hoping for another 40-50 pounds lighter picture by my birthday in April!  Wish me luck!

If you want to see what motivates me, click for my workouts board, or my inspiration board. :)

What motivates you?  If you're starting a weight loss journey or there's one in progress, share with me! I'd love to hear about it!


Friday, June 30, 2017

Basement Door frosting

Do you ever feel like just wearing whatever you feel like in your house, even if it's nothing at all? Want to do that without having to run like the Flash past windows so neighbors or pedestrians don't see you? Want to do all that but still let light in without putting curtains up on door windows?

I hate thinking that people are looking into my house at night.  It's dark outside so I can't see out but you can bet if someone is looking they can see me if my lights are on! And when you live in a city, the neighbors windows look into yours easily. I don't like it, which is a little hypocritical of me because I like glancing into people's windows when I'm driving at night to see how they decorate their houses.  Don't judge me, you know you do it too ;).

Most of my windows do have curtains on them but there's one window I always feel paranoid I'm going to see someone standing there looking in at me.  It's my back door that goes out to the fenced in back yard.  It's right at the top of the stairs to the basement that I just fixed up in a post a few weeks ago. Here's a little reminder of the pretty fake wood peel and stick tiles.
 
See that door on the right? That goes out to the mud room and then my back yard, but you can see right into the back yard. That's the one I was hesitant to walk by at night which wasn't good because the master bedroom is in the basement (I know it's kind of weird, but there's so much more room down there! If you want a spacious master, you put it where there's enough room).


I wanted to get some privacy but I didn't want to add a curtain to the door because I thought that'd look way too 50's kitchen and I have brand new flooring on my stairs! Plus the stairway is dark enough I didn't want to darken it further with fabric.  So naturally I hit Pinterest:
Contact paper cutouts create a "frosted" glass pattern on a door -- could use this on the shower door perhaps?very light frosting on glass front doors - Google Search

Obviously the first inspiration pin is more attainable for the DIYer so I set out to find a stencil and where did I go? You guessed it, Hobby Lobby.  I found this stencil there and it was pretty decently priced plus I can use it again! I also got the cans of frost there too!
So the process began of taping the stencil and covering the rest of the window with saran wrap to keep the "frosting" off the places I didn't want it to be.
Then spray, let dry, move stencil and saran wrap, and repeat until finished.


Now I feel much more at ease going up and down the stairs at night.  If there is someone back there they won't be able to see clearly what's going on inside but I can still peek out through the sides.

Next time you think about curtains on a door, maybe consider frosting :) it's beautiful, lets the light in but also gives the privacy/safety needed.

What do you think? Are you a frosting or curtain person?

Friday, June 23, 2017

String art

As promised from my Spring fresh start post, here's how we made our cute little string art projects!

Before we got started, we hit Pinterest to see what kind of afternoon project we should work on for our "Crafternoons" :)

We found a couple string art projects that looked fun and pretty easy.
MADE TO ORDER - Home & Heart String ArtHome | Spijkerschriften, muurteksten, string-art, spijkerteksten…Heart Strings Attached Giveaway

Then we found the winner:
Bird String art all strung up

The only challenge was to re-create it. So Deb had the idea to print this out and use it as a template for creating our own.  We had a plan :) so it was off to the happiest place on earth.....Hobby Lobby.

We found these great wood pieces with frames on them, blank and just asking to be turned into something.  We also found the little gold nails and the perfect colors we wanted to use for the birds and twig.

With our print offs in hand, we taped it in place and started nailing in the little gold nails.  Luckily the picture showed the nails so we just put our nails right on top!
The nails are really small so we used these tongs to hold the nail upright.  I tried using my fingers, the nails kept falling over and when they didn't I tended to hit my fingers because they were in the way, ouch!

Once the nails were all in place, we pulled off the stencil, carefully, some of the nails wanted to come out with the paper so there were a few that needed to be hammered back in. With a free work surface we started winding the string.
When we were satisfied with the amount of string we tied it off and sat back to admire the handiwork.


Here's the finished product in it's happy little home. (This picture was taken before my Spring Time refresh but it's still on the same wall, just a new spot :)


Any new projects you want to try?  Tempted to try some string art of your own?

Sunday, June 18, 2017

Basement Stairs re-do with the help of the best Dad ever!

Happy Father's Day everyone! This is my Dad.  He is quite possibly the best Dad in the world.  He's kind, hardworking, caring, would do anything for anyone and he's taught me and my sister Lonna those skills as well.  He's a carpenter and he helped me renovate my antique buffet.  Of course this wasn't the first project he's helped me with, and vice versa, I've spent most of my life helping him in his garage with various things.  He turned his old garage into a new master suite for him and Mom and I can't tell you how much mudding and painting I've helped him with, also the classic, "hand me a hammer," or "go grab me a few nails please" tasks you ask little kids to do to make them feel like they're helping.  Oh did I love it though! I loved snapping the straight chalk line after he measured, and most of the time I think Lonna and I did a lot more playing around the work than we did actual work but I don't think Dad ever minded.  I think it was his job as a carpenter is what made me so interested in home design and home decor.  I loved going to visit the large houses he was working on, especially when they were almost done and the finishing touches were being added.

Here's a little proof that this was in my blood since I was teeny tiny while I "helped" Dad build my Grandparent's house.

A few months ago (because I'm terrible at posting any fresh projects) he helped me make-over the stairs to my basement that cost only about $35.

First the before pictures.
 
They were so old!

It's like a linoleum from the 70's or 80's maybe.  and the white toe kicks or whatever you call them, the risers, were stained up and just in need of a refresh.

What was I going to do with them you ask? Let's take a stroll to my basement board for the inspiration Pins.
step by step on how to get rid of carpeted stairs and transform to stain/painted stairs. Next project on my list!How to redo stairs on a student budget. I AM DOING THIS!!!!Google Image Result for http://www.11magnolialane.com/wp-content/uploads/2012/06/stairs-with-beadboard-risers.jpg
If you can sense a pattern I love dark wood! If I had my choice all my wood furniture/cabinets/floors everything would be dark wood.  Most of these pins was a matter of staining the wood that was under people's carpets or linoleum or whatever.  So I started scraping and peeling and after hours and hours I got this far:

Haha yes, just the landing.  It was so tedious! Whatever glue they used was really strong! Whenever you watch home improvement shows they make it look so easy.  Even when I "helped" my dad reno our bathroom when I was younger, he pulled up that old linoleum so easily pulling up big pieces in one yank.  Well not the case with mine! It was coming up in little tiny chunks so I'd have to pull and scrape so much! I never knew I could get such a long hard work out in one little area.

Anyway, after I saw what was underneath and my lack of ability to remove all the glue I decided staining what was underneath was not an option so I started shopping.  I didn't wan to use glue so peel and stick tile seemed like a good option.  Whomever laid the flooring in my mud room seemed to have used peel and stick tile and it looked pretty good and seemed like something I could handle in a relatively short amount of time.

I was able to find this peel and stick wood from Lowe's for under $1 per square foot!
Style Selections 6-in x 36-in Driftwood/Gray Peel-And-Stick Residential Vinyl Plank
I did the math, and then I did it again 4 times before I placed the order.  I was so scared I would get enough and I'd have to go back and risk it being out of stock.  I also was worried I'd get way too much, although that'd be better because I'm always doing projects, I knew I'd put it to use sometime.  As worried as I was about that, I was even more worried to lay it down and have it look stupid, or not make cuts in the right places and waste the tile.  That's when I called Daddy! I need his expert measuring skills.  He agreed to come so I scrubbed the linoleum that I couldn't pull up so the tile would have nothing to stick to but the stair itself and gave the toe kicks a fresh coat of white paint.

My Dad came and we got to work.  I'd resume my old jobs of handing him more tile when he was done measuring, taking the trash and scrap pieces out of the work area, and making sure he had enough water and keeping the animals out of his way (ok that was a new job, we never were allowed pets growing up, probably why I have so many now lol).

Once he had the tiles in place, I'd follow behind and screw the stair tread caps back on. It only took about 3 hours and we were done!


Now the stairs have joined the 21st century! I can't wait to get a fresh coat of paint on the walls in this hall and get everything decorated up the way I like it.  Get excited because I've got a few more projects to do in this stairway before everything's all done. Stay tuned!

What do you think? Do you think you might try some peel and stick tile projects? Remember they don't have to just go on your floor.  Open your mind, stick them on the wall, or on a canvas, or in the back of a bookshelf.  The possibilities are endless.